Categories

Newsletter

Fingerprint Scanner Sensor (Arduino Compatible) Maximize

Fingerprint Scanner Sensor (Arduino Compatible)

Use this fingerprint scanner to recognize fingerprints in your Arduino projects! Register up to 162 fingerprints and recognize them using this Fingerprint scanner sensor via Serial! Easy to use  with just 2 Pins for Tx and Rx! Includes a BONUS integrated proximity capacitive sensor on the blue and yellow wires for low power applications.

More details

Availability: SHIPS TODAY

Last Updated: 11/24/2024

Tinkersphere

TS1241

$49.90

Features:

  • Make adding fingerprint detection and verification super simple.
  • Typically used in safes­-there's a high powered DSP chip that does the image rendering, calculation, feature-finding and searching.
  • Connect to any microcontroller or system with TTL serial, and send packets of data to take photos, detect prints, hash and search.
  • You can also enroll new fingers directly - up to 162 finger prints can be stored in the onboard FLASH memory.
  • There's a red LED in the lens that lights up during a photo so you know it is working.


Specifications:

  • Supply voltage: DC 3.8-7.0V
  • Operating Current: <65mA
  • Peak current: <95mA
  • Fingerprint image time: <1.0 seconds
  • Window area: 14.5*19.4 mm
  • Signature File: 256 bytes
  • Template files: 512 bytes
  • Storage capacity: 1000
  • False Accept Rate (FAR): <0.001% (security level 3)
  • False Reject Rate (FRR): <1.0% (security level 3)
  • Search time: <1.0 seconds (1: 500 average)
  • PC interface: UART (TTL logic level)
  • Baud rate (UART): (9600*N)bps (N=1~12, N default 6, equal 57600bps)
  • Working environment: Temperature: -20 °C to 50 °C
  • Relative Humidity: 40% RH to 85% RH (non-condensing)
  • Storage Environment: Temperature: -40 °C to 85 °C
  • Relative humidity: <85% H (no condensation)
  • Lighting: Long light/Flashing
  • Dimensions (L* W* H): 56*20*20.5mm


Note:

There are basically two requirements for using the optical fingerprint sensor:

  • First is you'll need to enroll fingerprints - that means assigning ID #'s to each print so you can query them later.
  • Once you've enrolled all your prints, you can easily 'search' the sensor, asking it to identify which ID (if any) is currently being photographed.

You can enroll by using the windows software (easiest because it shows you the photograph of the print) or with the Arduino sketch (good for when you don't have a windows machine handy or for on-the-road enrolling)

Pinout:

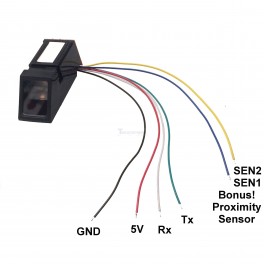
  • Red: 5V Power
  • Black: 0V GND
  • Green: Tx (Pin 2 on Arduino)
  • White: Rx (Pin 3 on Arduino)
  • BONUS! Blue & Yellow: Integrated proximity capacitive sensor for low power applications


Useful Resource: https://learn.adafruit.com/adafruit-optical-fingerprint-sensor/wiring-for-use-with-arduino

No customers have asked questions about this product yet.